08-后端Web实战(员工管理)

08-后端Web实战(员工管理)
Smith实现了部门管理的功能之后,接下来我们再来实现员工管理的功能。
从页面原型中,我们可以看到,在查询员工信息的时候,除了要展示 姓名、性别、头像、职位、入职日期、最后操作时间这些员工信息外,还要展示出所属部门,那此时就需要从两张表中查询数据,一张是部门表,一张是员工表,此时就会涉及到多表操作。 所以今天的课程内容如下:
课程内容:
- 多表关系
- 多表查询
- 员工列表查询
1. 多表关系
项目开发中,在进行数据库表结构设计时,会根据业务需求及业务模块之间的关系,分析并设计表结构,由于业务之间相互关联,所以各个表结构之间也存在着各种联系,基本上分为三种:
- 一对多(多对一)
- 多对多
- 一对一
1.1 一对多
场景:部门与员工的关系(一个部门下有多个员工)。
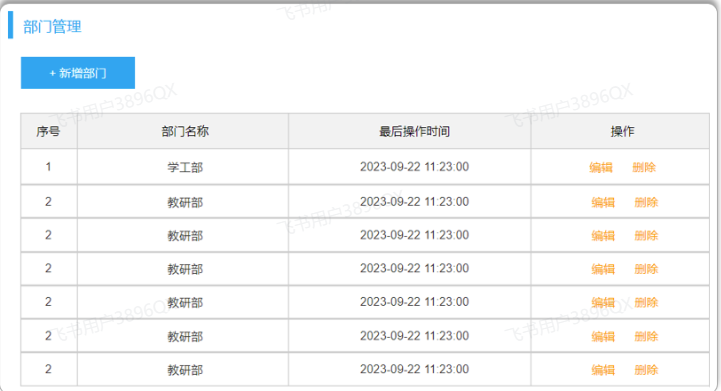
部门管理的页面原型:
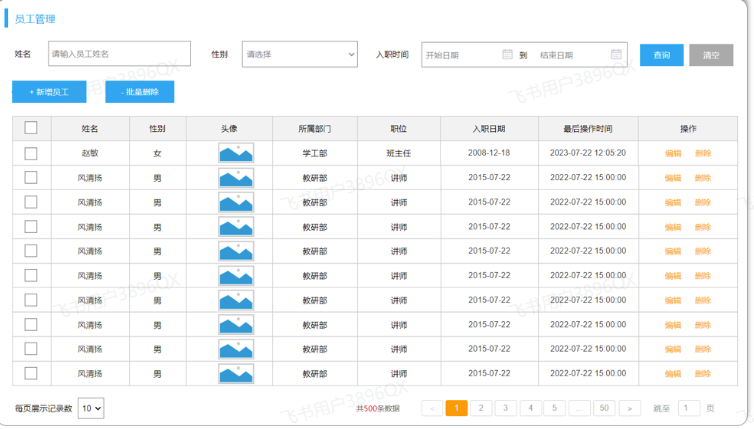
- 员工管理的页面原型:
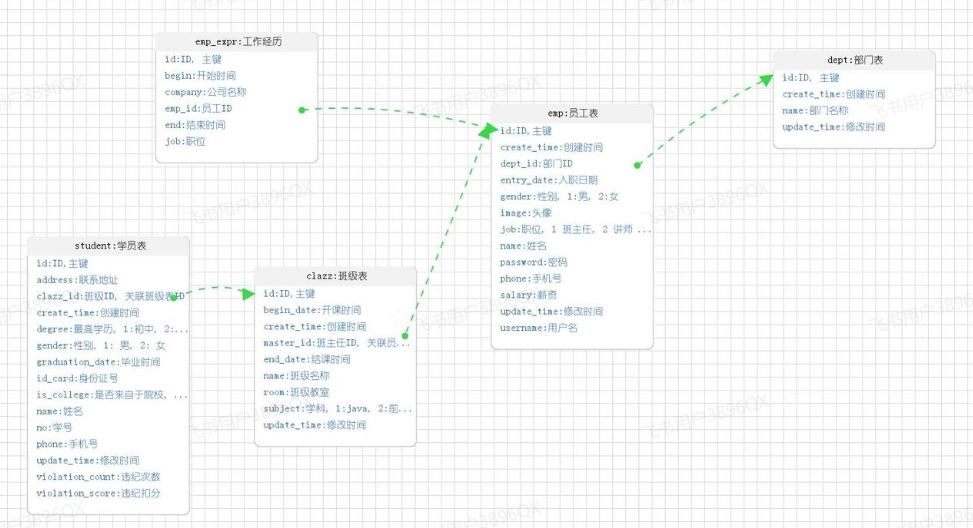
由于一个部门下,会关联多个员工。 而一个员工,是归属于某一个部门的 。那么此时,我们就需要在 emp 表中增加一个字段 dept_id 来标识这个员工属于哪一个部门,dept_id 关联的是 dept 的 id 。 如下所示:
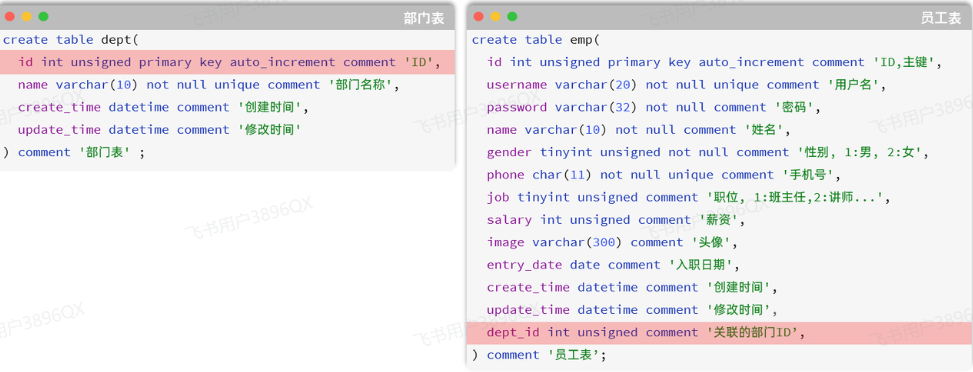
上述的 emp 员工表的 dept_id 字段,关联的是 dept 部门表的 id 。部门表是一的一方,也称为父表,员工表是多的一方,称之为子表。
那接下来,我们就可以将上述的两张表创建出来。具体的SQL语句如下:
1 | CREATE TABLE dept ( |
问题:一对多的表关系,在数据库层面该如何实现 ?
在数据库表中多的一方,添加字段,来关联一的一方的主键 。
1.2 多表问题分析
1.2.1 问题
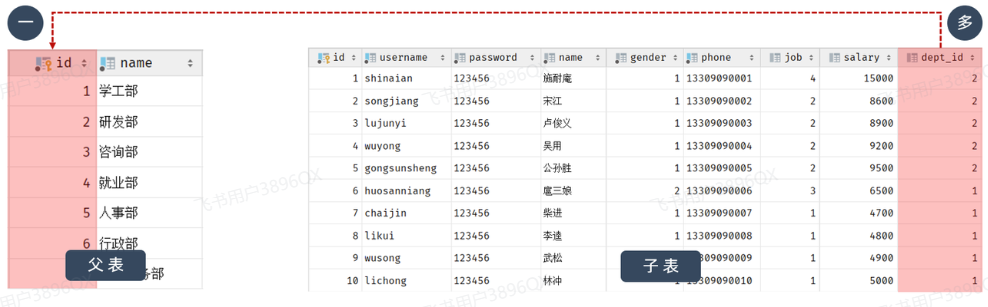
表结构创建完毕后,我们看到两张表的数据分别为:
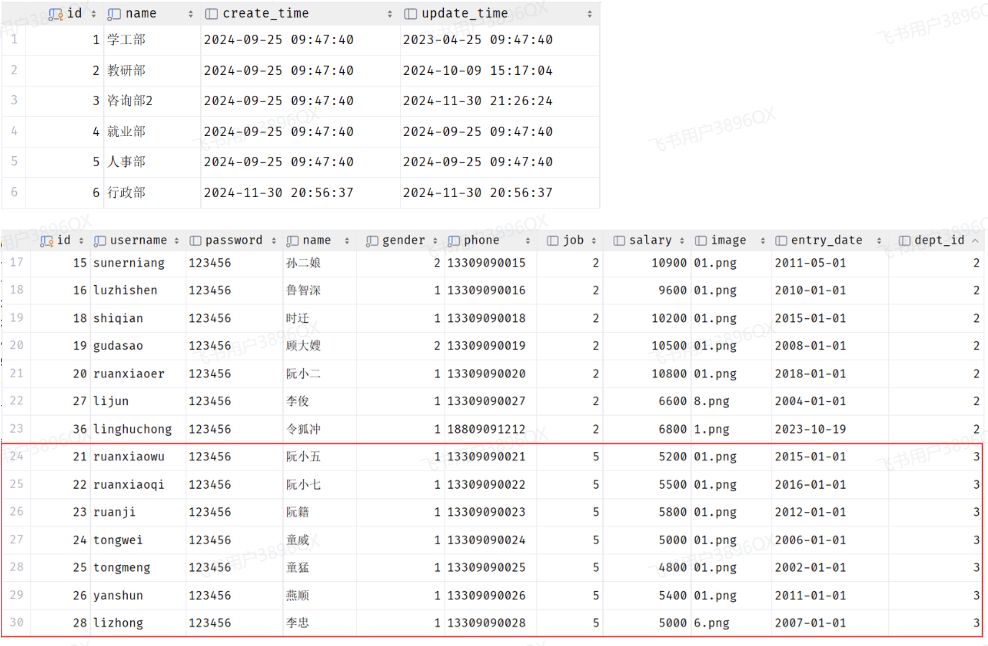
我们看到,在3号部门下,是关联的有7个员工。 当删除了3号部门后,数据变为:
3号部门被删除了,但是依然还有7个员工是属于3号部门的。 此时:就出现数据的不完整、不一致了。
1.2.2 分析
- 现象:部门数据可以直接删除,然而还有部分员工归属于该部门下,此时就出现了数据的不完整、不一致问题 。
- 原因:目前上述的两张表,在数据库层面,并未建立关联,所以是无法保证数据的一致性和完整性的 。
- 解决方案:想解决上述的问题呢,我们就可以通过数据库中的 外键约束 来解决。
外键约束:让两张表的数据建立连接,保证数据的一致性和完整性。
对应的关键字:foreign key
外键约束的语法:
1 | -- 创建表时指定 |
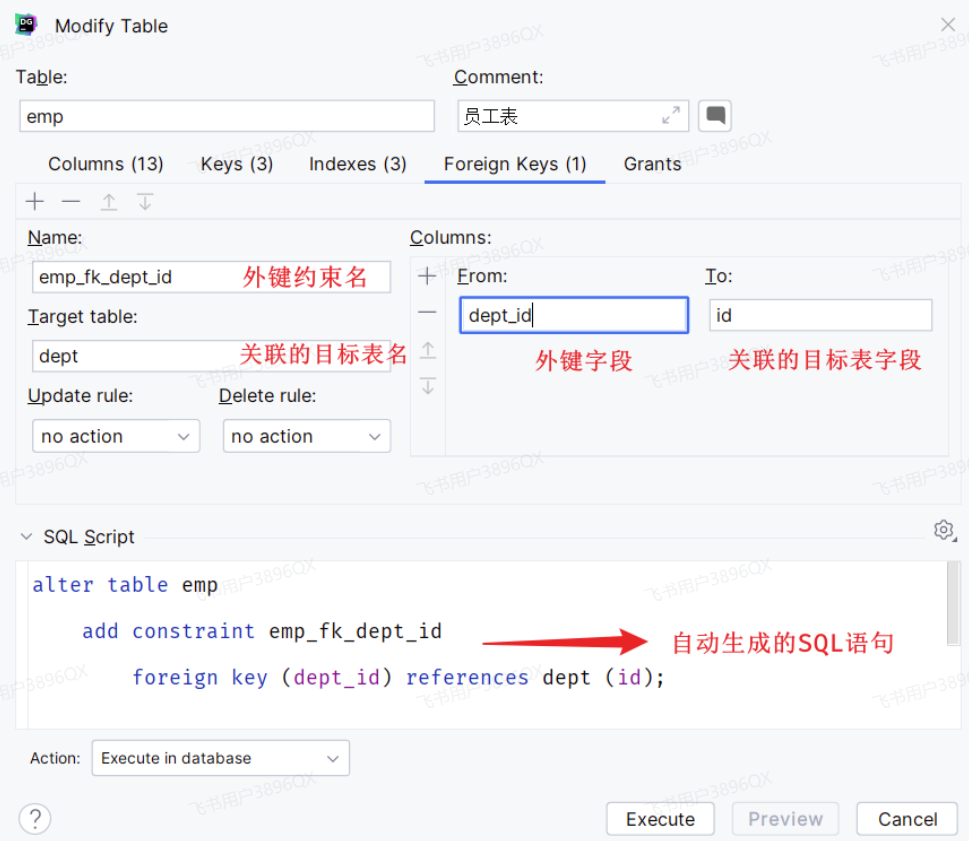
那接下来,我们就为员工表的dept_id 建立外键约束,来关联部门表的主键。
当我们添加外键约束时,我们得保证当前数据库表中的数据是完整的。 所以,我们需要将之前删除掉的数据再添加回来。
方式1:通过SQL语句操作
1 | -- 修改表: 添加外键约束 |
方式2:图形化界面操作
在左侧菜单栏,在emp表上右键,选择 modify Table... (old UI)
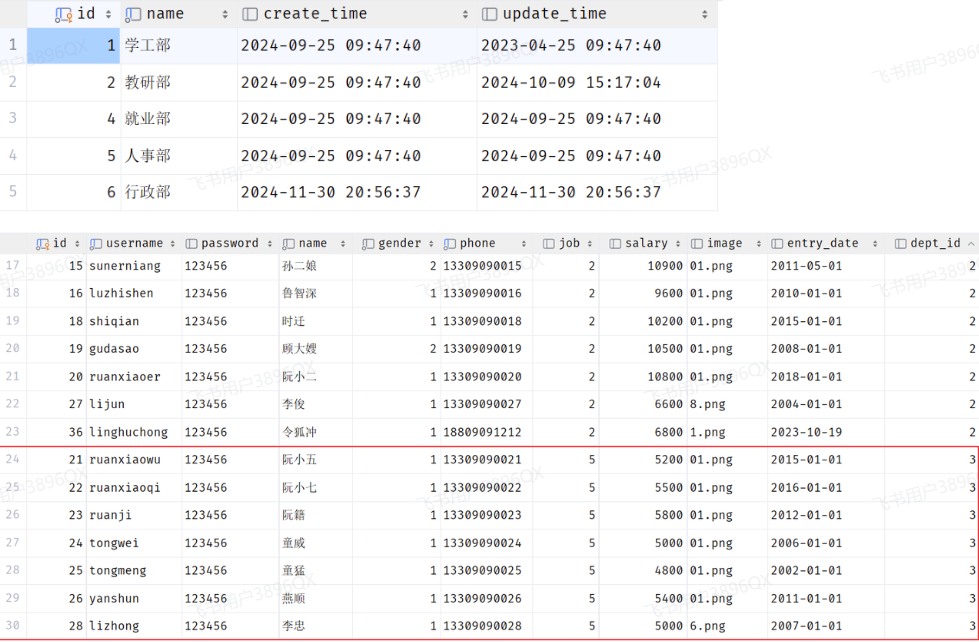
当我们添加了外键之后,再删除ID为3的部门,就会发现,此时数据库报错了,不允许删除。
外键约束(foreign key):保证了数据的完整性和一致性。
1.2.3 物理外键与逻辑外键
物理外键
概念:使用foreign key定义外键关联另外一张表。
缺点:
- 影响增、删、改的效率(需要检查外键关系)。
- 仅用于单节点数据库,不适用于分布式、集群场景。
- 容易引发数据库的死锁问题,消耗性能。
逻辑外键
- 概念:在业务层逻辑中,解决外键关联。
- 通过逻辑外键,就可以很方便的解决上述问题。
在现在的企业开发中,很少会使用物理外键,都是使用逻辑外键。 甚至在一些数据库开发规范中,会明确指出禁止使用物理外键 foreign key
1.3 一对一
一对一关系表在实际开发中应用起来比较简单,通常是用来做单表的拆分,也就是将一张大表拆分成两张小表,将大表中的一些基础字段放在一张表当中,将其他的字段放在另外一张表当中,以此来提高数据的操作效率。
一对一的应用场景: 用户表(基本信息+身份信息)

- 基本信息:用户的ID、姓名、性别、手机号、学历
- 身份信息:民族、生日、身份证号、身份证签发机关,身份证的有效期(开始时间、结束时间)
如果在业务系统当中,对用户的基本信息查询频率特别的高,但是对于用户的身份信息查询频率很低,此时出于提高查询效率的考虑,我就可以将这张大表拆分成两张小表,第一张表存放的是用户的基本信息,而第二张表存放的就是用户的身份信息。他们两者之间一对一的关系,一个用户只能对应一个身份证,而一个身份证也只能关联一个用户。
那么在数据库层面怎么去体现上述两者之间是一对一的关系呢?
其实一对一我们可以看成一种特殊的一对多。一对多我们是怎么设计表关系的?是不是在多的一方添加外键。同样我们也可以通过外键来体现一对一之间的关系,我们只需要在任意一方来添加一个外键就可以了。

SQL脚本:
1 | -- 用户基本信息表 |
一对一 :在任意一方加入外键,关联另外一方的主键,并且设置外键为唯一的(UNIQUE)
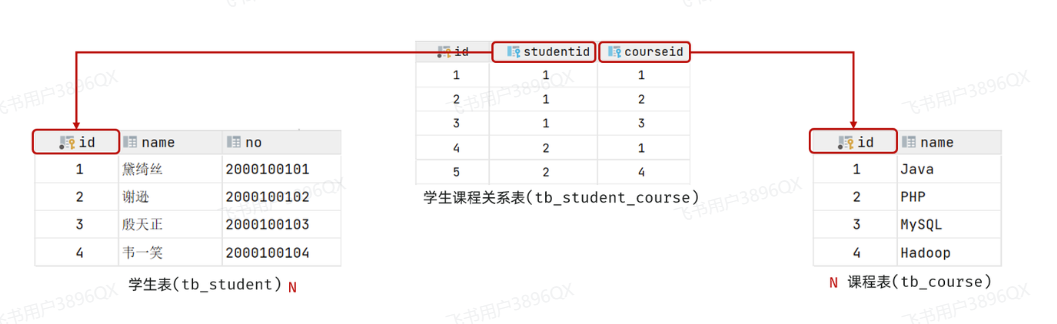
1.4 多对多
多对多的关系在开发中属于也比较常见的。比如:学生和老师的关系,一个学生可以有多个授课老师,一个授课老师也可以有多个学生。在比如:学生和课程的关系,一个学生可以选修多门课程,一个课程也可以供多个学生选修。
案例:学生与课程的关系
- 关系:一个学生可以选修多门课程,一门课程也可以供多个学生选择
- 实现关系:建立第三张中间表,中间表至少包含两个外键,分别关联两方主键
SQL脚本:
1 | -- 学生表 |
多对多 :需要建立一张中间表,中间表中有两个外键字段,分别关联两方的主键。
1.5 案例
下面通过一个综合案例加深对于多表关系的理解,并掌握多表设计的流程。
需求
- 根据参考资料中提供的《Talis智能学习辅助系统》页面原型,设计员工管理模块涉及到的表结构。
步骤
- 阅读页面原型及需求文档,分析各个模块涉及到的表结构,及表结构之间的关系。
- 根据页面原型及需求文档,分析各个表结构中具体的字段及约束。
分析
涉及到的模块有:
- 部门管理
部门管理涉及到一张部门表,这个前面我们都已经设计过了。 无需再进行设计了。
- 员工管理
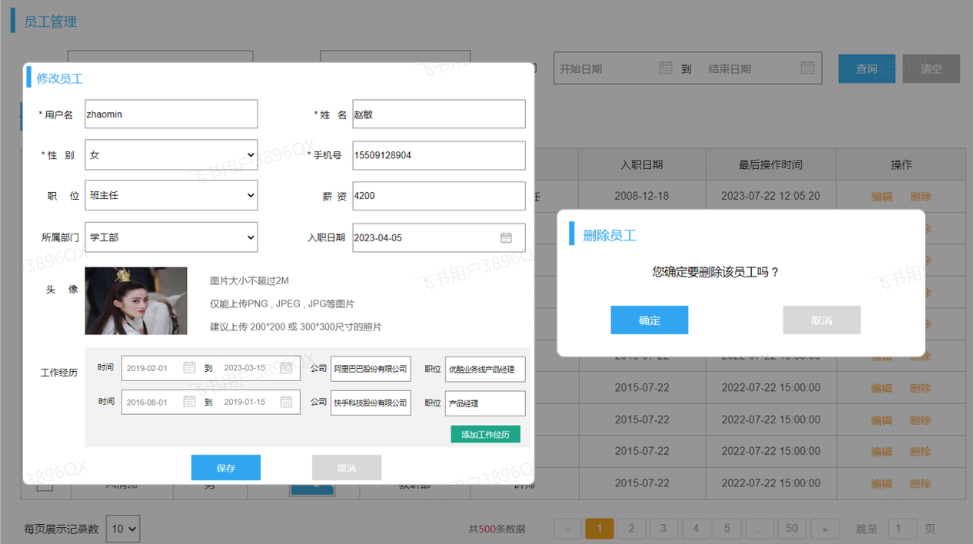
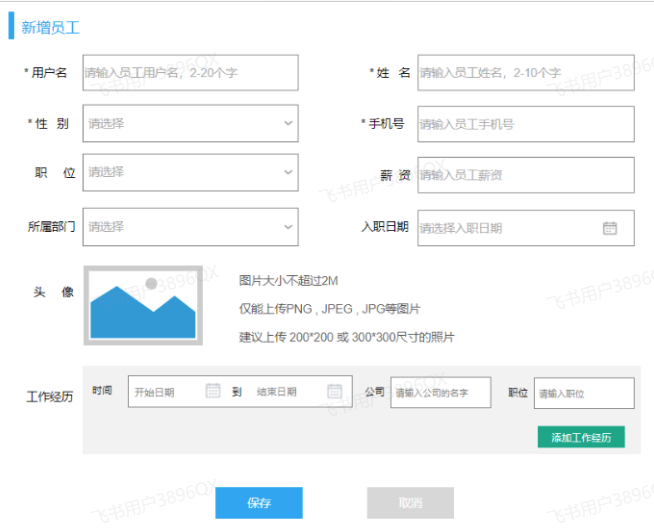
上述在员工列表查询的页面原型,当我们点击 “新增员工” 按钮时,会弹出一个新增员工的表单,表单展示形式如下:
在上述的页面原型中,我们可以看到,每一个员工是归属于某一个部门的,而一个部门下可以有多个员工,所以部门与员工之间的关系是一对多的关系。
从页面员工中,我们可以看到,员工还有工作经历的信息。而每一个员工,是可以添加多个工作经历的。 所以,工作经历我们可以再设计一张表,而员工与员工的工作经历之间的关系,是一对多的关系。
那么,这里总共会涉及三张表,分别是:部门表、员工表、员工工作经历表。
最终,具体的表结构如下:
1 | -- 部门表 |
注意:在上述的表结构设计中,我们使用的都是逻辑外键。
2. 多表查询
2.1 概述
2.1.1 数据准备
创建数据库,执行如下SQL脚本:
1 | -- 部门管理 |
2.1.2 介绍
多表查询:查询时从多张表中获取所需数据
单表查询的SQL语句:select 字段列表 from 表名;
那么要执行多表查询,只需要使用逗号分隔多张表即可,如: select 字段列表 from 表1, 表2;
查询用户表和部门表中的数据:
1 | select * from emp , dept; |
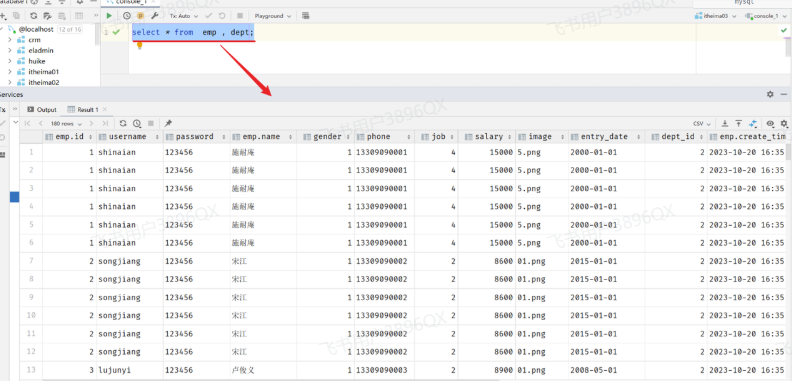
此时,我们看到查询结果中包含了大量的结果集,总共180条记录,而这其实就是员工表所有的记录(30行)与部门表所有记录(6行)的所有组合情况,这种现象称之为笛卡尔积。
笛卡尔积: 笛卡尔乘积是指在数学中,两个集合(A集合和B集合)的所有组合情况。
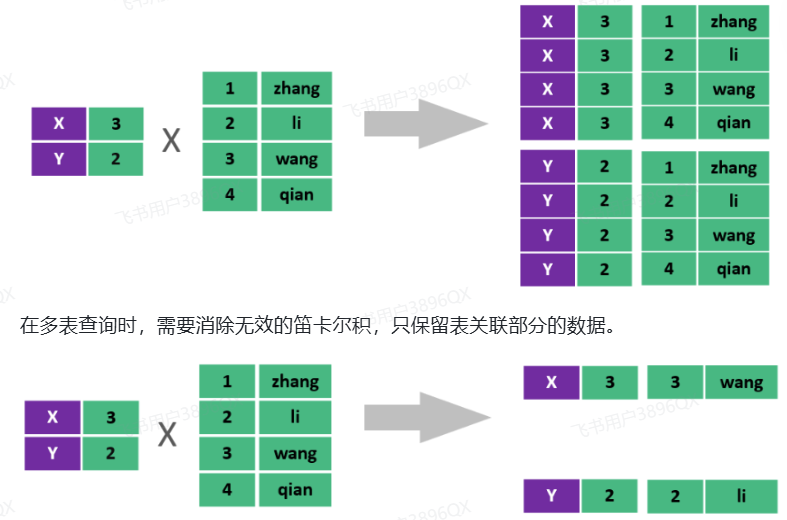
在多表查询时,需要消除无效的笛卡尔积,只保留表关联部分的数据。
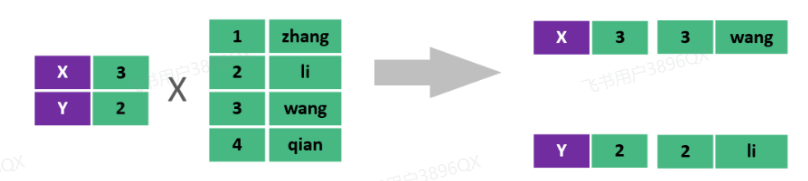
在SQL语句中,如何去除无效的笛卡尔积呢?只需要给多表查询加上连接查询的条件即可。
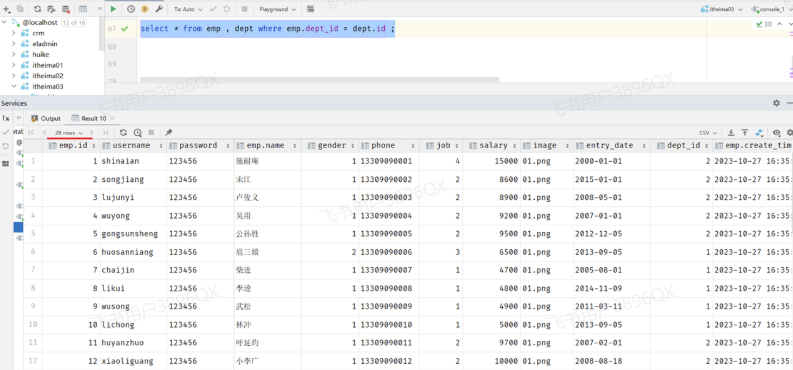
1 | select * from emp , dept where emp.dept_id = dept.id ; |
这样,我们就查询出来了所有的员工,及其这个员工所属的部门信息。 而由于id为29、30的员工,没有dept_id字段值,所以在多表查询时,根据连接查询的条件并没有查询到。
2.1.3 分类
多表查询可以分为:

连接查询
- 内连接:相当于查询A、B交集部分数据
- 外连接
- 左外连接:查询左表所有数据(包括两张表交集部分数据)
- 右外连接:查询右表所有数据(包括两张表交集部分数据)
子查询
2.2 内连接
内连接查询:查询两表或多表中交集部分数据。
内连接从语法上可以分为:
- 隐式内连接
- 显式内连接
隐式内连接语法:
1 | select 字段列表 from 表1 , 表2 where 条件 ... ; |
显式内连接语法:
1 | select 字段列表 from 表1 [ inner ] join 表2 on 连接条件 ... ; |
案例1:查询所有员工的ID,姓名,及所属的部门名称
- 隐式内连接实现
1 | select emp.id, emp.name, dept.name from emp , dept where emp.dept_id = dept.id; |
- 显式内连接实现
1 | select emp.id, emp.name, dept.name from emp inner join dept on emp.dept_id = dept.id; |
案例2:查询 性别为男, 且工资 高于8000 的员工的ID, 姓名, 及所属的部门名称
- 隐式内连接实现
1 | select emp.id, emp.name, dept.name from emp , dept where emp.dept_id = dept.id and emp.gender = 1 and emp.salary > 8000; |
- 显式内连接实现
1 | select emp.id, emp.name, dept.name from emp inner join dept on emp.dept_id = dept.id where emp.gender = 1 and emp.salary > 8000; |
在多表联查时,我们指定字段时,需要在字段名前面加上表名,来指定具体是哪一张的字段。 如:emp.dept_id
给表起别名简化书写:
1 | select 字段列表 from 表1 as 别名1 , 表2 as 别名2 where 条件 ... ; |
使用了别名的多表查询:
1 | select e.id, e.name, d.name from emp as e , dept as d where e.dept_id = d.id and e.gender = 1 and e.salary > 8000; |
注意事项: 一旦为表起了别名,就不能再使用表名来指定对应的字段了,此时只能够使用别名来指定字段。
2.3 外连接
外连接分为两种:左外连接 和 右外连接。
左外连接语法:
1 | select 字段列表 from 表1 left [ outer ] join 表2 on 连接条件 ... ; |
左外连接相当于查询表1(左表)的所有数据,当然也包含表1和表2交集部分的数据。
右外连接语法:
1 | select 字段列表 from 表1 right [ outer ] join 表2 on 连接条件 ... ; |
右外连接相当于查询表2(右表)的所有数据,当然也包含表1和表2交集部分的数据。
案例1:查询员工表 所有 员工的姓名, 和对应的部门名称 (左外连接)
1 | -- 左外连接:以left join关键字左边的表为主表,查询主表中所有数据,以及和主表匹配的右边表中的数据 |
案例2:查询部门表 所有 部门的名称, 和对应的员工名称 (右外连接)
1 | -- 右外连接:以right join关键字右边的表为主表,查询主表中所有数据,以及和主表匹配的左边表中的数据 |
案例3:查询工资 高于8000 的 所有员工的姓名, 和对应的部门名称 (左外连接)
1 | select e.name , d.name from emp as e left join dept as d on e.dept_id = d.id where e.salary > 8000; |
注意事项:
左外连接和右外连接是可以相互替换的,只需要调整连接查询时SQL语句中表的先后顺序就可以了。而我们在日常开发使用时,更偏向于左外连接。
2.4 子查询
2.4.1 介绍
SQL语句中嵌套select语句,称为嵌套查询,又称子查询。
1 | SELECT * FROM t1 WHERE column1 = ( SELECT column1 FROM t2 ... ); |
子查询外部的语句可以是insert / update / delete / select 的任何一个,最常见的是 select。
根据子查询结果的不同分为:
- 标量子查询(子查询结果为单个值 [一行一列])
- 列子查询(子查询结果为一列,但可以是多行)
- 行子查询(子查询结果为一行,但可以是多列)
- 表子查询(子查询结果为多行多列[相当于子查询结果是一张表])
子查询可以书写的位置:
- where之后
- from之后
- select之后
子查询的要点是,先对需求做拆分,明确具体的步骤,然后再逐条编写SQL语句。 最终将多条SQL语句合并为一条。
2.4.2 标量子查询
子查询返回的结果是单个值(数字、字符串、日期等),最简单的形式,这种子查询称为标量子查询。
常用的操作符: = <> > >= < <=
- 案例1:查询 最早入职 的员工信息
1 | -- 1. 查询最早的入职时间 |
- 案例2:查询在 阮小五 入职之后入职的员工信息
1 | -- 1. 查询 "阮小五" 的入职日期 |
2.4.3 列子查询
子查询返回的结果是一列(可以是多行),这种子查询称为列子查询。
常用的操作符:

- 案例1:查询 “教研部” 和 “咨询部” 的所有员工信息
1 | -- 1. 查询 "教研部" 和 "咨询部" 的部门ID |
2.4.4 行子查询
子查询返回的结果是一行(可以是多列),这种子查询称为行子查询。
常用的操作符:= 、<> 、IN 、NOT IN
- 案例1:查询与 “李忠” 的薪资 及 职位都相同的员工信息
1 | -- 1. 查询 "李忠" 的薪资和职位 |
2.4.5 表子查询
子查询返回的结果是多行多列,常作为临时表,这种子查询称为表子查询。
- 案例:获取每个部门中薪资最高的员工信息
1 | -- a. 获取每个部门的最高薪资 |
2.4.6 案例
根据需求,完成多表查询的SQL语句的编写。
- 1. 查询 “教研部” 性别为 男,且在 “2011-05-01” 之后入职的员工信息 。
1 | select e.* from emp as e , dept as d where e.dept_id = d.id and d.name = '教研部' and e.gender = 1 and e.entry_date > '2011-05-01'; |
- 2. 查询工资 低于公司平均工资的 且 性别为男 的员工信息 。
1 | select e.* from emp as e , dept as d where e.dept_id = d.id and e.salary < (select avg(salary) from emp) and e.gender = 1; |
- 3. 查询部门人数超过 10 人的部门名称 。
1 | select d.name , count(*) from emp as e , dept as d where e.dept_id = d.id group by d.name having count(*) > 10; |
- 4. 查询在 “2010-05-01” 后入职,且薪资高于 10000 的 “教研部” 员工信息,并根据薪资倒序排序。
1 | select * from emp e , dept d where e.dept_id = d.id and e.entry_date > '2010-05-01' and e.salary > 10000 and d.name = '教研部' order by e.salary desc; |
- 5. 查询工资 低于本部门平均工资的员工信息 。【难】
1 | -- 5.1 查询每个部门的平均工资 |
3. 员工列表查询
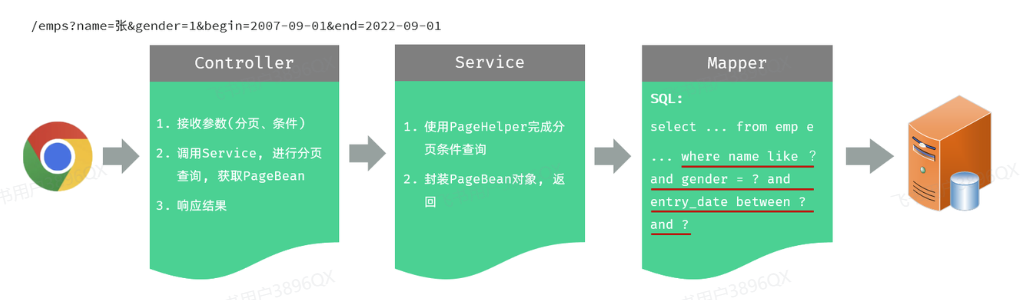
那接下来,我们要来完成的是员工列表的查询功能实现。 具体的需求如下:
在查询员工列表数据时,既需要查询 员工的基本信息,还需要查询员工所属的部门名称,所以这里呢,会涉及到多表查询的操作。
而且,在查询员工列表数据时,既要考虑搜索栏中的查询条件,还要考虑对查询的结果进行分页处理。
那么接下来,我们在实现这个功能时,将会分为三个部分来逐一实现:
- 准备工作
- 分页查询
- 条件分页查询
3.1 准备工作
需求:查询所有员工信息,并查询出部门名称。(涉及到的表:emp、dept)
3.1.1 基础代码准备
1). 创建员工管理相关表结构
1 | -- 员工表 |
2). 准备emp表对应的实体类Emp、EmpExpr
1 | package com.itheima.pojo; |
1 | package com.itheima.pojo; |
3). 准备Emp员工管理的基础结构,包括Controller、Service、Mapper
EmpMapper:
1 | package com.itheima.mapper; |
EmpService:
1 | package com.itheima.service; |
EmpServiceImpl:
1 | package com.itheima.service.impl; |
EmpController:
1 | package com.itheima.controller; |
3.1.2 SQL&Mapper接口
那接下来,我们就先考虑一下要查询所有的员工数据,及其关联的部门名称,这个SQL语句该如何实现 ? 这里,要查询所有的员工,也就意味着,即使员工没有部门,也需要将该员工查询出来 。
所以,这里需要用左外连接实现,具体SQL如下:
1). 基于AI生成对应的SQL语句
1 | -- 查询所有的员工信息,如果员工关联了部门,也要查询出部门名称 |
2). Mapper接口方法定义
那接下来,我们就定义一个员工管理的mapper接口 EmpMapper 并在其中完成员工信息的查询。 具体代码如下:
1 |
|
注意,上述SQL语句中,给 部门名称起了别名 deptName ,是因为在接口文档中,要求部门名称给前端返回的数据中,就必须叫 deptName。 而这里我们需要将查询返回的每一条记录都封装到Emp对象中,那么就必须保证查询返回的字段名与属性名是一一对应的。
此时,我们就需要在Emp中定义一个属性 deptName 用来封装部门名称。 具体如下:
1 |
|
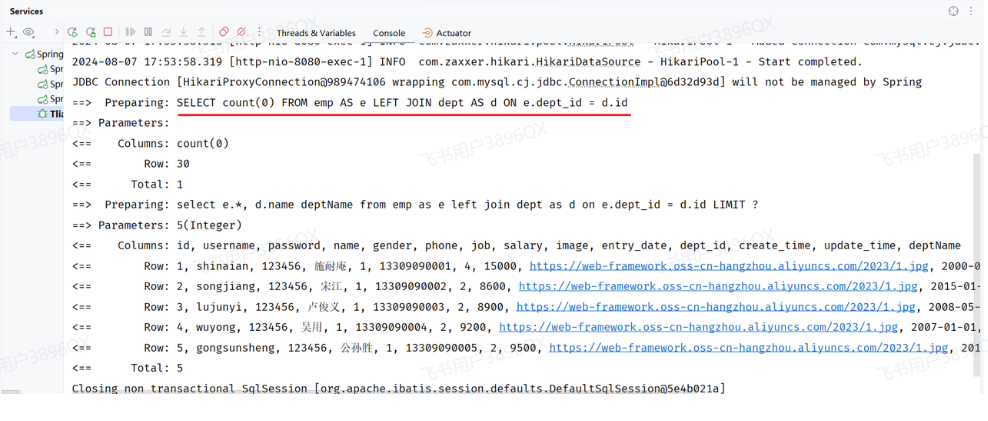
代码编写完毕后,我们可以编写一个单元测试,对上述的程序进行测试:
1 |
|
运行单元测试后,我们看到控制台输出的数据:
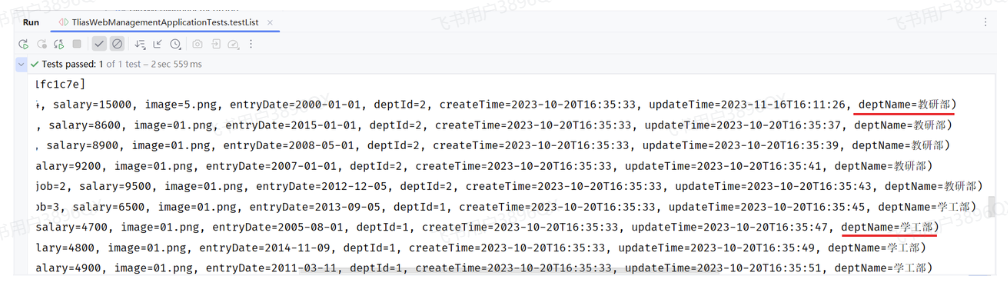
可以看到,员工的信息,员工关联的部门名称都查询出来了。
3.2 分页查询
3.2.1 分析
上述我们在Mapper接口中定义了接口方法,完成了查询所有员工及其部门名称的功能,是将数据库中所有的数据查询出来了。 试想如果数据库中的数据有很多(假设有几千几万条)的时候,将数据全部展示出来肯定不现实,那如何解决这个问题呢?
使用分页解决这个问题。每次只展示一页的数据,比如:一页展示10条数据,如果还想看其他的数据,可以通过点击页码进行查询。
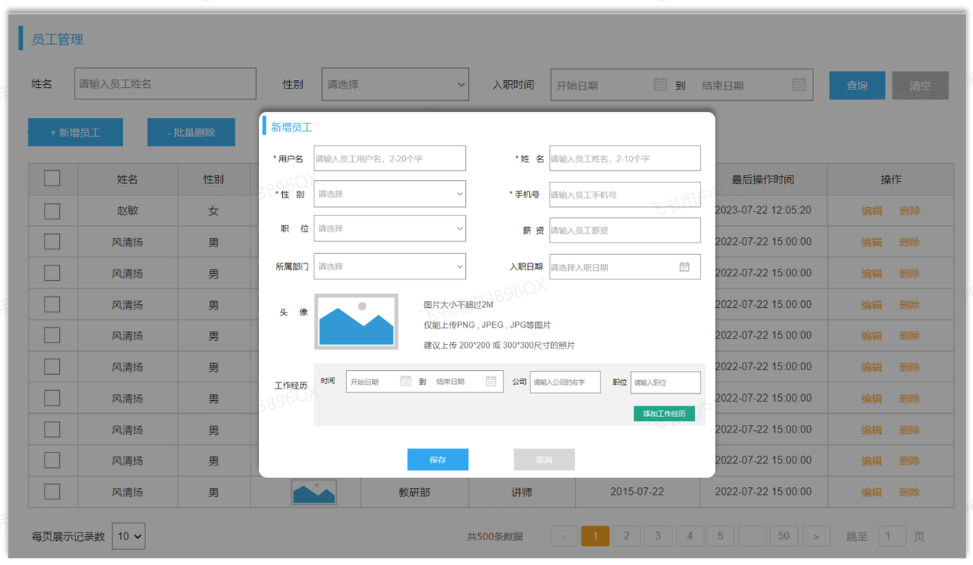
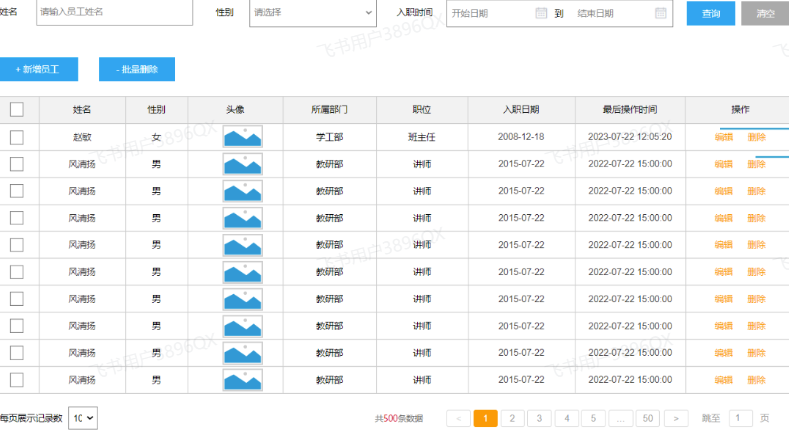
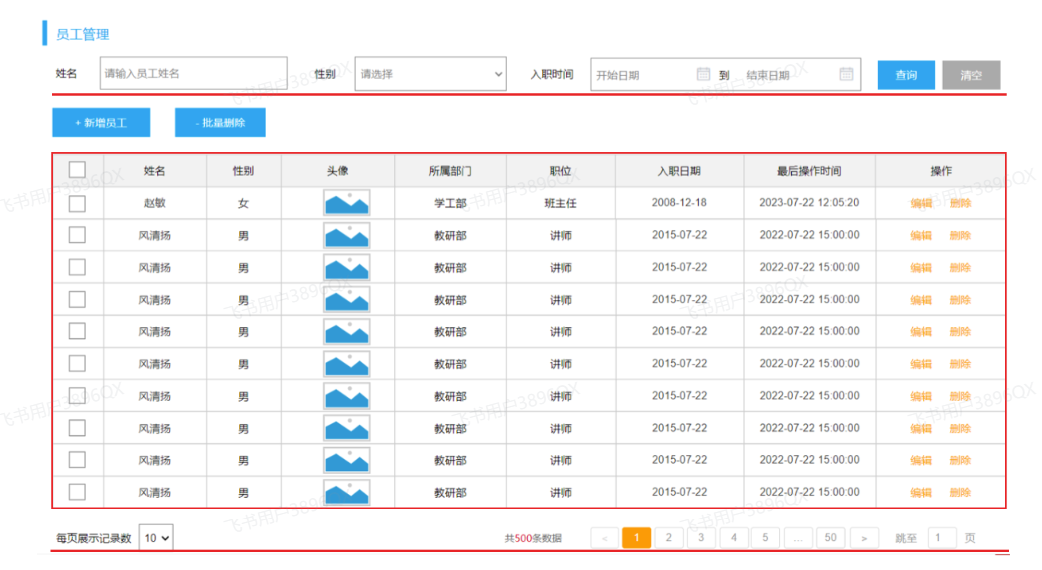
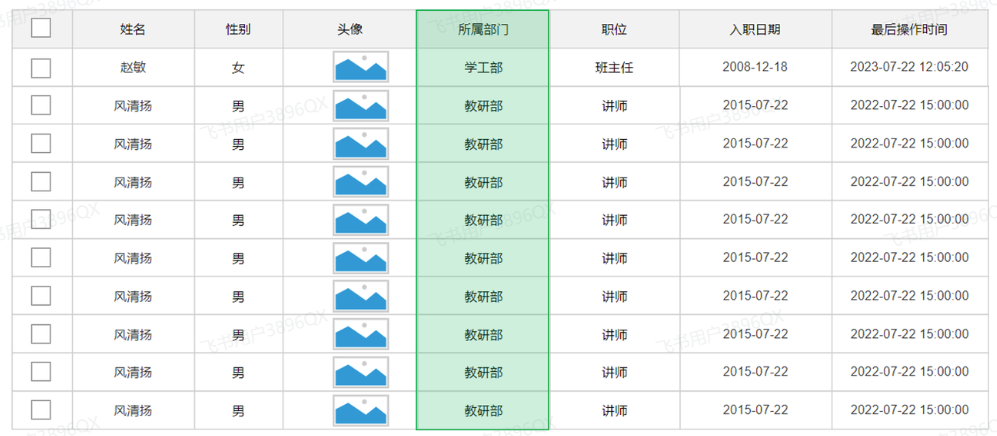
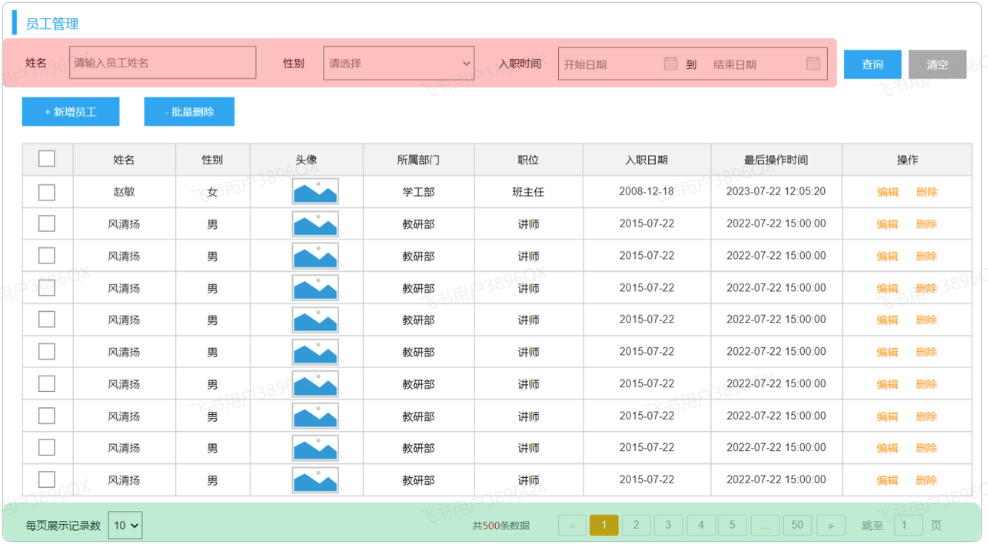
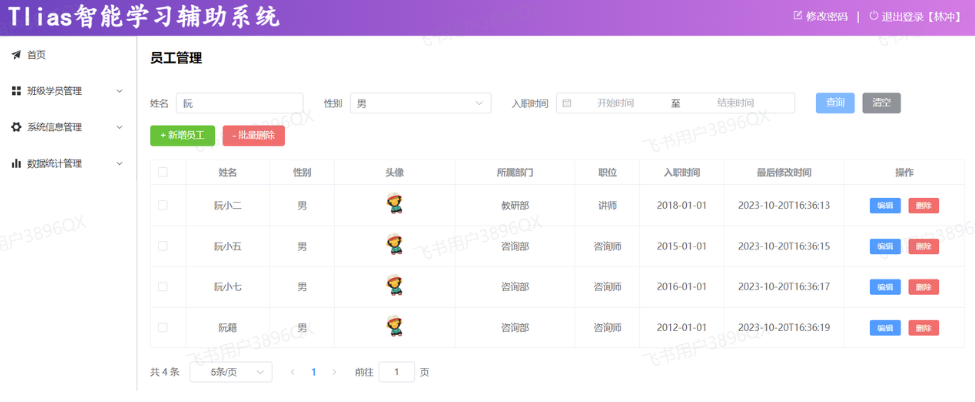
而在员工管理的需求中,就要求我们进行分页查询,展示出对应的数据。 具体的页面原型如下:
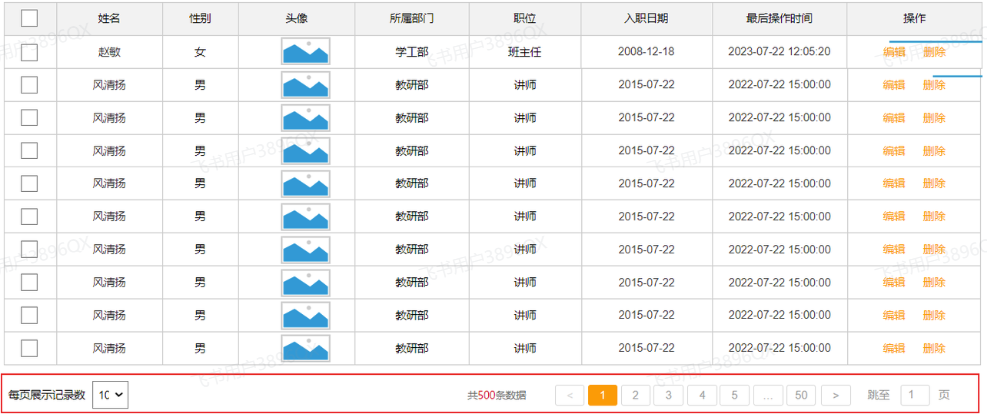
要想从数据库中进行分页查询,我们要使用LIMIT关键字,格式为:limit 开始索引 每页显示的条数。
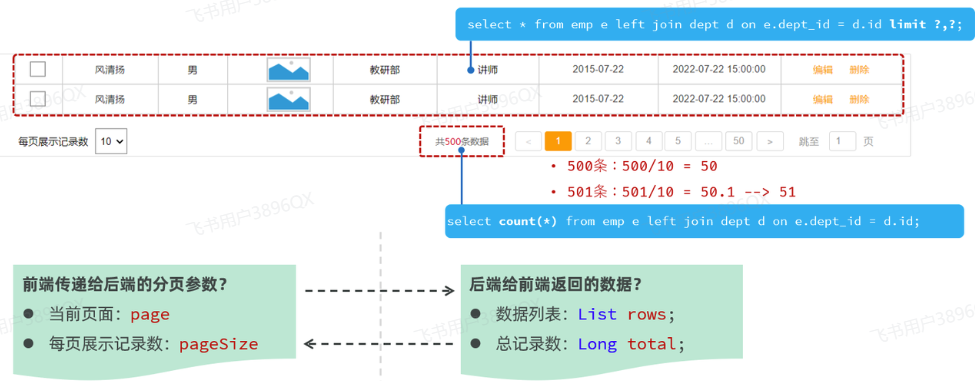
1). 查询第1页数据的SQL语句是:
1 | select * from emp limit 0,10; |
2). 查询第2页数据的SQL语句是:
1 | select * from emp limit 10,10; |
3). 查询第3页的数据的SQL语句是:
1 | select * from emp limit 20,10; |
观察以上SQL语句,发现: 开始索引一直在改变 , 每页显示条数是固定的
开始索引的计算公式: 开始索引 = (当前页码 - 1) * 每页显示条数
我们继续基于页面原型,继续分析,得出以下结论:
前端在请求服务端时,传递的参数
- 当前页码 page
- 每页显示条数 pageSize
后端需要响应什么数据给前端
- 所查询到的数据列表(存储到List 集合中)
- 总记录数
后台给前端返回的数据包含:List集合(数据列表)、total(总记录数)
而这两部分我们通常封装到PageResult对象中,并将该对象转换为json格式的数据响应回给浏览器。
1 |
|
3.2.2 接口描述
1). 基本信息
请求路径:/emps
请求方式:GET
接口描述:该接口用于员工列表数据的条件分页查询
2). 请求参数
| 参数名称 | 是否必须 | 示例 | 备注 |
|---|---|---|---|
| name | 否 | 张 | 姓名 |
| gender | 否 | 1 | 性别 , 1 男 , 2 女 |
| begin | 否 | 2010/1/1 | 范围匹配的开始时间(入职日期) |
| end | 否 | 2020/1/1 | 范围匹配的结束时间(入职日期) |
| page | 是 | 1 | 分页查询的页码,如果未指定,默认为1 |
| pageSize | 是 | 10 | 分页查询的每页记录数,如果未指定,默认为10 |
| 请求数据样例: |
1 | /emps?name=张&gender=1&begin=2007-09-01&end=2022-09-01&page=1&pageSize=10 |
3). 响应数据
参数格式:application/json
参数说明:
| 名称 | 类型 | 是否必须 | 备注 |
|---|---|---|---|
| code | number | 必须 | 响应码, 1 成功 , 0 失败 |
| msg | string | 非必须 | 提示信息 |
| data | object | 必须 | 返回的数据 |
| |- total | number | 必须 | 总记录数 |
| |- rows | object [] | 必须 | 数据列表 |
| |- id | number | 非必须 | id |
| |- username | string | 非必须 | 用户名 |
| |- name | string | 非必须 | 姓名 |
| |- password | string | 非必须 | 密码 |
| |- gender | number | 非必须 | 性别 , 1 男 ; 2 女 |
| |- image | string | 非必须 | 图像 |
| |- job | number | 非必须 | 职位, 说明: 1 班主任,2 讲师, 3 学工主管, 4 教研主管, 5 咨询师 |
| |- salary | number | 非必须 | 薪资 |
| |- entryDate | string | 非必须 | 入职日期 |
| |- deptId | number | 非必须 | 部门id |
| |- deptName | string | 非必须 | 部门名称 |
| |- createTime | string | 非必须 | 创建时间 |
| |- updateTime | string | 非必须 | 更新时间 |
| 响应数据样例: |
1 | { |
目前我们只考虑分页查询,先不考虑查询条件,而上述的接口文档中,与分页查询相关的参数就两个,一个是page,一个是pageSize。
3.2.3 原始方式
3.2.3.1 代码实现
通过查看接口文档:员工列表查询
请求路径:/emps
请求方式:GET
请求参数:跟随在请求路径后的参数字符串。 例:/emps?page=1&pageSize=10
响应数据:json格式
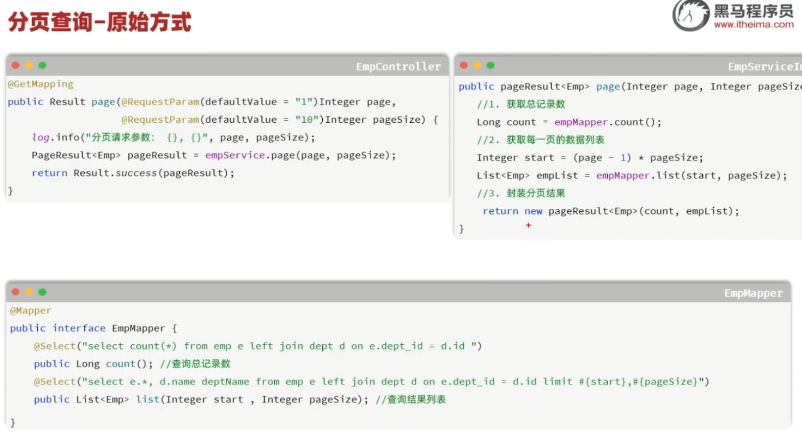
1). EmpController
1 |
|
@RequestParam(defaultValue=”默认值”) //设置请求参数默认值
2). EmpService
1 | public interface EmpService { |
3). EmpServiceImpl
1 |
|
4). EmpMapper
1 |
|
3.2.3.2 功能测试
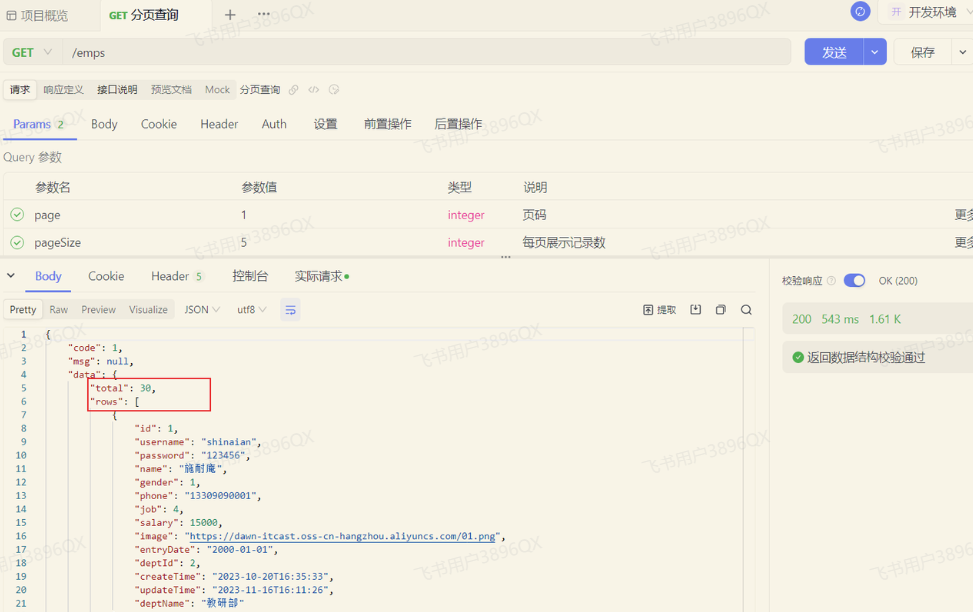
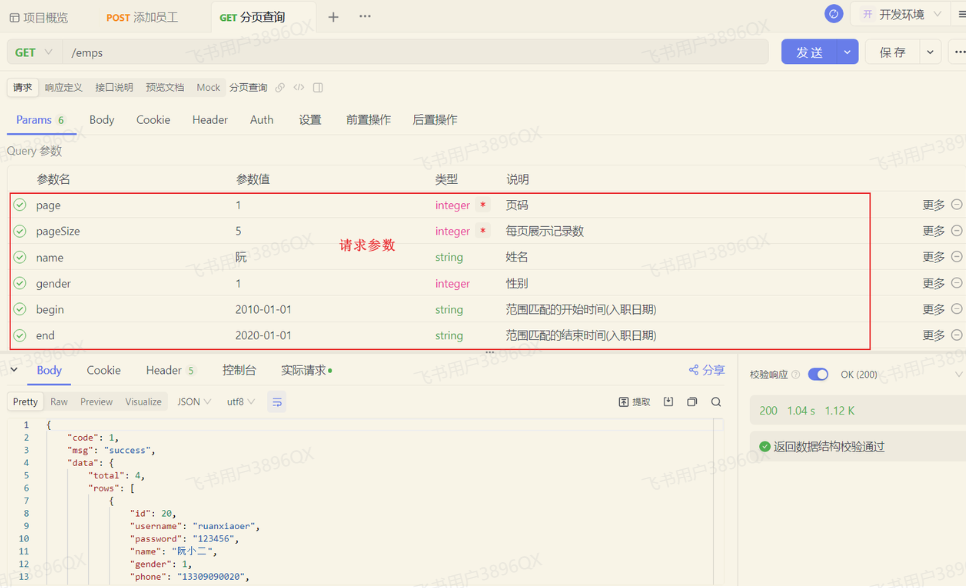
功能开发完成后,重新启动项目,使用Apifox,发起GET请求:

3.2.3.3 前后端联调
打开浏览器,测试后端功能接口:
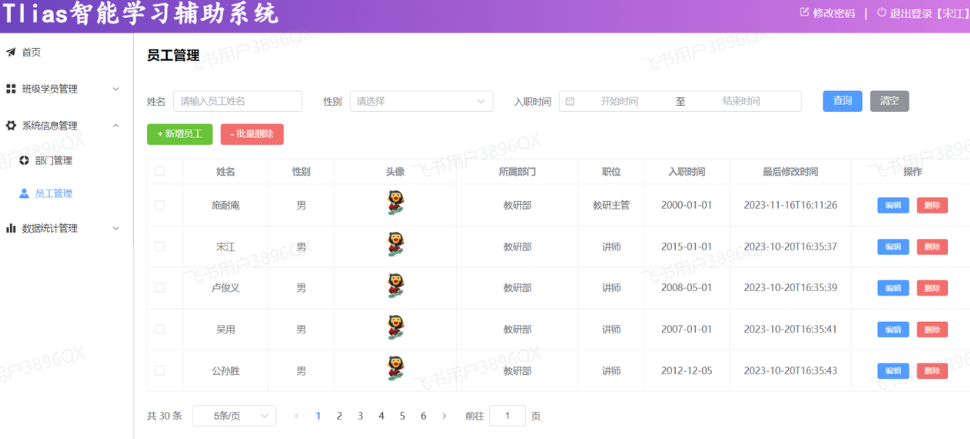
点击下面的页码,可以正常的查询出对应的数据 。
3.2.4 PageHelper分页插件
3.2.4.1 介绍
前面我们已经完了基础的分页查询,大家会发现:分页查询功能编写起来比较繁琐。 而分页查询的功能是非常常见的,我们查询员工信息需要分页查询,将来在做其他项目时,查询用户信息、订单信息、商品信息等等都是需要进行分页查询的。
而分页查询的思路、步骤是比较固定的。 在Mapper接口中定义两个方法执行两条不同的SQL语句:
- 查询总记录数
- 指定页码的数据列表
在Service当中,调用Mapper接口的两个方法,分别获取:总记录数、查询结果列表,然后在将获取的数据结果封装到PageBean对象中。
大家思考下:在未来开发其他项目,只要涉及到分页查询功能(例:订单、用户、支付、商品),都必须按照以上操作完成功能开发
结论:原始方式的分页查询,存在着”步骤固定”、”代码频繁”的问题
解决方案:可以使用一些现成的分页插件完成。对于Mybatis来讲现在最主流的就是PageHelper。
PageHelper是第三方提供的Mybatis框架中的一款功能强大、方便易用的分页插件,支持任何形式的单标、多表的分页查询。
官网: https://pagehelper.github.io/
那接下来,我们可以对比一下,使用PageHelper分页插件进行分页 与 原始方式进行分页代码实现的上的差别。

Mapper接口层:
- 原始的分页查询功能中,我们需要在Mapper接口中定义两条SQL语句。
- PageHelper实现分页查询之后,只需要编写一条SQL语句,而且不需要考虑分页操作,就是一条正常的查询语句。
Service层:
- 需要根据页码、每页展示记录数,手动的计算起始索引。
- 无需手动计算起始索引,直接告诉PageHelper需要查询那一页的数据,每页展示多少条记录即可。
3.2.4.2 代码实现
当使用了PageHelper分页插件进行分页,就无需再Mapper中进行手动分页了。 在Mapper中我们只需要进行正常的列表查询即可。在Service层中,调用Mapper的方法之前设置分页参数,在调用Mapper方法执行查询之后,解析分页结果,并将结果封装到PageResult对象中返回。
1). 在pom.xml引入依赖
1 | <!--分页插件PageHelper--> |
2). EmpMapper
1 | /** |
3). EmpServiceImpl
1 |
|
3.2.4.3 功能测试
功能开发完成后,我们重启项目工程,打开Apifox,发起GET请求,访问 :http://localhost:8080/emps?page=1\&pageSize=5
我们可以看到数据可以正常查询返回,是可以正常实现分页查询的。
3.2.4.4 实现机制
我们打开Idea的控制台,可以看到在进行分页查询时,输出的SQL语句。
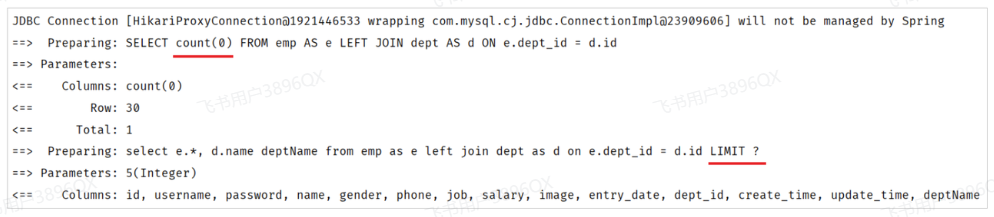
我们看到执行了两条SQL语句,而这两条SQL语句,其实是从我们在Mapper接口中定义的SQL演变而来的。
- 第一条SQL语句,用来查询总记录数。

其实就是将我们编写的SQL语句进行的改造增强,将查询返回的字段列表替换成了 count(0) 来统计总记录数。
- 第二条SQL语句,用来进行分页查询,查询指定页码对应 的数据列表。

其实就是将我们编写的SQL语句进行的改造增强,在SQL语句之后拼接上了limit进行分页查询,而由于测试时查询的是第一页,起始索引是0,所以简写为limit ?。
而PageHelper在进行分页查询时,会执行上述两条SQL语句,并将查询到的总记录数,与数据列表封装到了 Page<Emp> 对象中,我们再获取查询结果时,只需要调用Page对象的方法就可以获取。
注意:
PageHelper实现分页查询时,SQL语句的结尾一定一定一定不要加分号(;).。
PageHelper只会对紧跟在其后的第一条SQL语句进行分页处理。
3.3 条件分页查询
完了分页查询后,下面我们需要在分页查询的基础上,添加条件。
3.3.1 需求
通过员工管理的页面原型我们可以看到,员工列表页面的查询,不仅仅需要考虑分页,还需要考虑查询条件。 分页查询我们已经实现了,接下来,我们需要考虑在分页查询的基础上,再加上查询条件。
我们看到页面原型及需求中描述,搜索栏的搜索条件有三个,分别是:
- 姓名:模糊匹配
- 性别:精确匹配
- 入职日期:范围匹配
3.3.2 接口描述
参照接口文档中的 员工管理 -> 员工列表查询
3.3.3 思路分析
3.3.4 功能开发
通过查看接口文档:员工列表查询
请求路径:/emps
请求方式:GET
请求参数:
| 参数名称 | 是否必须 | 示例 | 备注 |
|---|---|---|---|
| name | 否 | 张 | 姓名 |
| gender | 否 | 1 | 性别 , 1 男 , 2 女 |
| begin | 否 | 2010/1/1 | 范围匹配的开始时间(入职日期) |
| end | 否 | 2020/1/1 | 范围匹配的结束时间(入职日期) |
| page | 是 | 1 | 分页查询的页码,如果未指定,默认为1 |
| pageSize | 是 | 10 | 分页查询的每页记录数,如果未指定,默认为10 |
在原有分页查询的代码基础上进行改造。
1). 在EmpController方法中通过多个方法形参,依次接收这几个参数
1 |
|
2). 修改EmpService及EmpServiceImpl中的代码逻辑
EmpService:
1 | public interface EmpService { |
EmpServiceImpl:
1 | /** |
3). 调整EmpMapper接口方法
1 |
|
由于SQL语句比较复杂,建议将SQL语句配置在XML映射文件中。
4). 新增Mapper映射文件EmpMapper.xml
1 | <!--定义Mapper映射文件的约束和基本结构--> |
功能测试:
测试时,需要注意传递的查询条件,有些查询条件查不到数据的,因为数据库没有符合条件的记录。
3.3.5 程序优化1
在上述分页条件查询中,请求参数比较多,有6个,如下所示:
- 请求参数:/emps?name=张&gender=1&begin=2007-09-01&end=2022-09-01&page=1&pageSize=10
那我们在controller层方法中,接收请求参数的时候,直接在controller方法中声明这样6个参数即可,这样做,功能可以实现,但是不方便维护和管理。
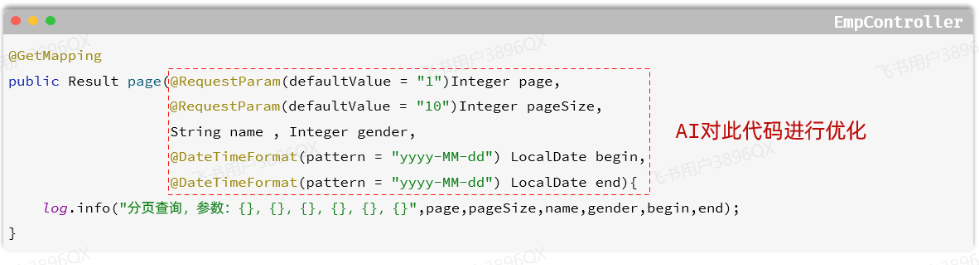
那接下来呢,我们就可以通过 通义零码 AI辅助工具,对这一块儿的代码进行优化。 具体操作如下:
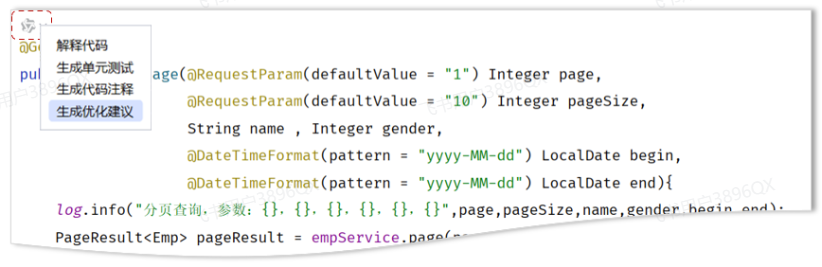
优化思路:定义一个实体类,来封装这几个请求参数。 【需要保证,前端传递的请求参数和实体类的属性名是一样的】
1). 定义实体类:EmpQueryParam
1 | package com.itheima.pojo; |
2). EmpController接收请求参数
1 |
|
3). 修改EmpService接口方法
1 | public interface EmpService { |
4). 修改EmpServiceImpl中的page方法
1 |
|
5). 修改EmpMapper接口方法
1 |
|
EmpMapper.xml 中的配置无需修改。
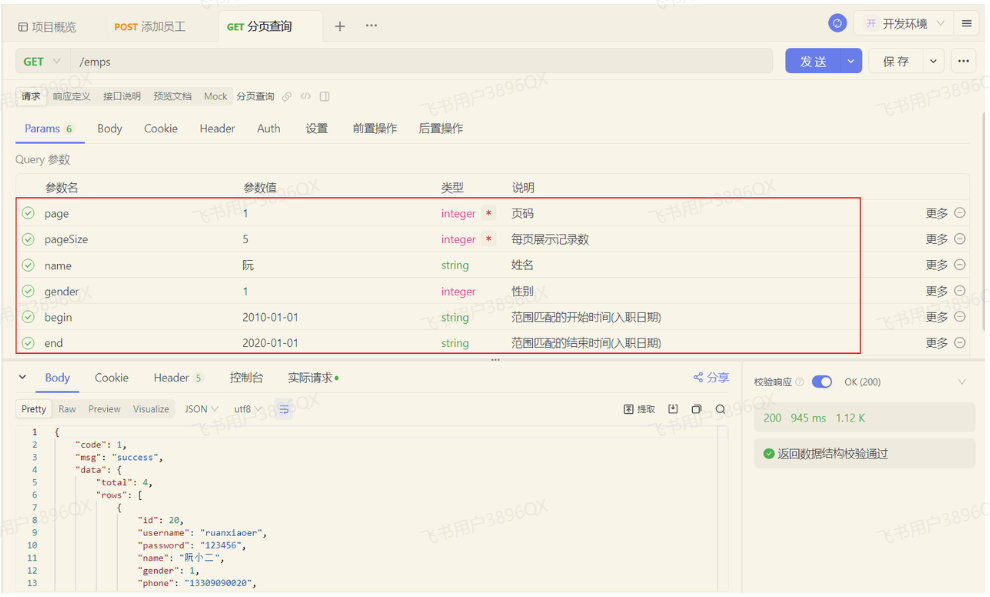
代码优化完毕之后,重新启动运行测试,依然正常运行:
当我们在测试的时候,页码输入负数,查询是有问题的,查不到对应的数据了。
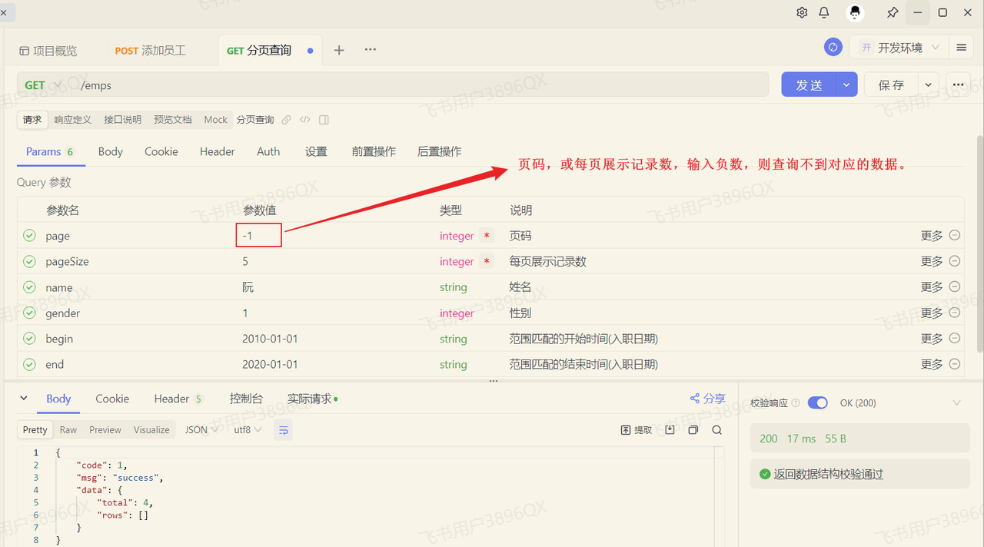
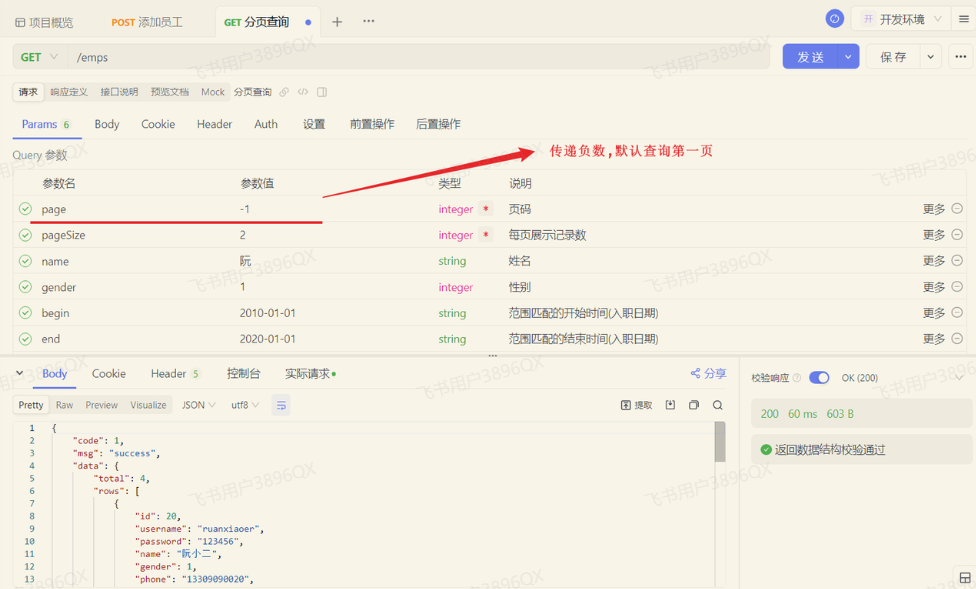
那其实在PageHelper中,我们可以通过合理化参数配置,来解决这个问题。直接在application.yml中,引入如下配置即可:
1 | pagehelper: |
reasonable:分页合理化参数,默认值为false。当该参数设置为true时,pageNum<=0时会查询第一页,pageNum>pages(超过总数时),会查询最后一页。默认false 时,直接根据参数进行查询。
测试如下:
3.3.6 程序优化2
当前,我们在查询的时候,Mapper映射配置文件中的SQL语句中,查询条件是写死的。 而我们在员工管理中,根据条件查询员工信息时,查询条件是可选的,可以输入也可以不输入。

- 如果只输入 姓名 这个查询条件,则SQL语句中只根据name字段查询,SQL如下:
1 | select e.*, d.name deptName from emp as e left join dept as d on e.dept_id = d.id where e.name like concat('%',#{name},'%'); |
- 如果只输入 性别 这个查询条件,则SQL语句中只根据gender字段查询,SQL如下:
1 | select e.*, d.name deptName from emp as e left join dept as d on e.dept_id = d.id where e.gender = #{gender}; |
- 如果输入 姓名 和 性别这两个查询条件,则SQL语句中要根据name、gender两个字段查询,SQL如下:
1 | select e.*, d.name deptName from emp as e left join dept as d on e.dept_id = d.id |
我们看到,这个SQL语句不应该是写死的,而应该根据用户输入的条件的变化而变化。 那这里呢,就要通过Mybatis中的动态SQL来实现。
所谓动态SQL,指的就是随着用户的输入或外部的条件的变化而变化的SQL语句。
具体的代码实现如下:
1 | <!--定义Mapper映射文件的约束和基本结构--> |
在这里呢,我们用到了两个动态SQL的标签:<if> <where>。 这两个标签的具体作用如下:
<if>:判断条件是否成立,如果条件为true,则拼接SQL。
<where>:根据查询条件,来生成where关键字,并会自动去除条件前面多余的and或or。
代码优化完毕后,重新启动服务,测试如下:

没有输入任何查询条件时,运行日志如下:
当我们输入姓名和性别时
运行日志如下:
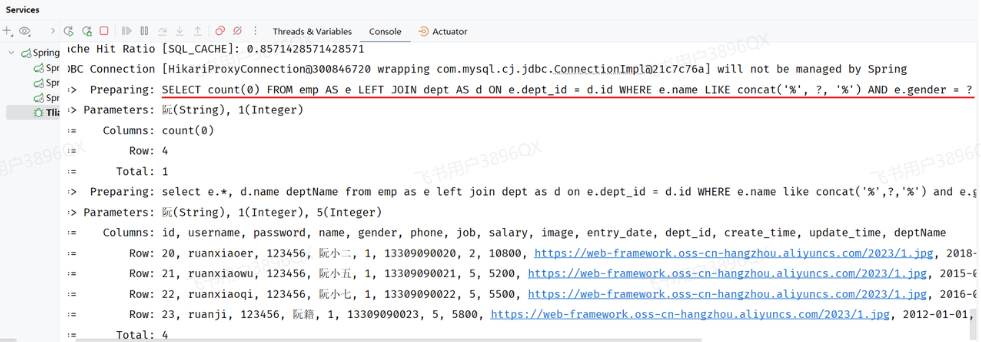
我们可以看到,当我们输入不同的搜索条件时,会动态的根据查询条件,动态拼接SQL语句。